Sony A100 Review
Review Date: September 18th 2006
Author: Gavin Stoker
Leave a comment about this Review
|
Ease of Use
Having steadily build up market share with its stylish Cyber-shot compacts and, latterly, aimed higher with super zooms like the DSC-H1, its H2 successor and the range-topping, but now overpriced and overcooked DSC-R1, it was only a matter of time before Sony would want a slice of the burgeoning digital SLR market. And a hefty slice at that, since it aims to become the number two player in DSLR, shunting aside the likes of Nikon and its new D80, to sit just below market leader Canon, whose own dominance was built on the success of the budget 350D. Sony may have shocked industry watchers with its wholesale buy out of Konica Minolta at the start of 2006 � in order to play catch up and quickly narrow the gap � but it obviously saw something of value and that latter company's innovations sensibly haven't been junked.
The Alpha, or Sony A100, visibly pays respect to Konica Minolta's heritage, resembling the Dynax/Maxxum 5D in looks and features, and perhaps most importantly by keeping the Minolta A-type lens mount (now of course the Alpha mount) it's cleverly afforded compatibility with a wealth of existing optics (Sony having just three of its own branded lenses available on launch, with around 21 in total promised by Christmas).
Since the Sony A100 currently stands alone as Sony's one-and-only DSLR, it's inevitably something of a half way house between a budget 'starter' DSLR and a more professional model, being the first sub �1000 model to boast a 10 megapixel chip (a resolution now matched by subsequent releases from its competitors), in fact a large APS-C size CCD sensor. Though it doesn't offer full frame capture, Sony strongly hinted at launch � via its relationship with Carl Zeiss in the optical department and that company's stated intention to deliver full frame lenses � that such a semi-pro model will shortly be added to the Alpha range.
Though the black finish model disguises it well, picking up the Sony A100 immediately betrays its mid-market price point, the body appearing lightweight and plastic to the touch. Arguably the former is no bad thing, affording one-handed operation with the 18-70mm kit lens attached if pushed, and will suit the younger, first time SLR user Sony is hoping to ensnare via its brand reputation. Although plasticky, the build is of sufficient robustness and quality not to have potential investors baulking at the price tag (�599 body only, �699 with standard zoom, or �849 if doubling up with 75-300mm lens), though one UK high street chain has already caused a ruckus by discounting the body only price by �50 and the zoom kit by �100, so shop around.
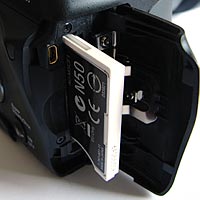
As this is a DSLR, no memory card is included with the camera itself. The available slot is for CompactFlash, so Sony has bundled a CompactFlash sized adapter for its high capacity Memory Stick Duo card. For the purposes of our test, I was shooting to a 2GB Memory Stick Pro Duo (via the adapter), with a mixture of RAW, simultaneous RAW+JPEG and, for sample images, Fine JPEG. Arguably the latter option is what the majority of its proposed customer base will go for. Surprisingly, write speed for the differing file formats appears nigh on instantaneous, meaning that in single shot mode you're not conscious of the camera processing the first image before you can take the second.
Before we start on the handling 'meat' of our review, it's worth focusing for a moment on the morsels Konica Minolta has fed Sony as an entr�e. As well as the aforementioned mount that boasts day one compatibility with a host of existing lenses, Konica Minolta's pioneering Anti Shake technology, whereby optical image stabilisation was built into the camera body itself rather than the lens, has also been adopted. Here it's been re-christened Super SteadyShot. It does much the same thing: adjusting for external hand-wobble by counter moving the CCD in a compensating manner. I found in my test that although it's not 100% effective � but then, for the outlay, not a surprise � I got more usable shots in low light conditions without flash than I thought possible (it's another story when it comes to visible image noise however; which we'll come to later).
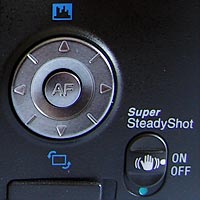
| Navigation Pad / Anti Shake Switch | Mode Dial |
 |
 |
And there's more. At the point of powering down, the Alpha's CCD vibrates to automatically shake off any dust that has found its way in when changing lenses. As a further line of defence, the chip itself sports an anti static coating. In the short term the anti-dust combo appears to work well � Sony took the bold step of letting us reviewers play with production models in the dust and fly-strewn outskirts of Marrakech at the launch, changing lenses several times over a day's shoot, with no noticeable ingress of dirt. Over a longer period of weeks, admittedly in the less demanding climes of the UK home counties, the system was still working fault free.
Gripping the Sony A100 with both hands and viewing the top and back, the layout of controls is friendly enough not to scare off anyone considering upgrading from a compact. The back is dominated by a clear 2.5-inch LCD, which, with a nice and high resolution of 230k pixels, usefully displays essential shooting information in the absence of a second LCD control panel window up top. It's clearly presented, and visibility isn't compromised by bright sun.
Inset above the LCD is the equally bright and clear optical viewfinder, surrounded by a spongy rubber eyepiece and with a tiny dioptric adjustment control ranged top right. The viewfinder displays standard shooting information along the bottom, with a central grid that illuminates in red which of the nine point AF areas is being utilized. Beneath the viewfinder is a sensor that pre-focuses a shot as you bring your eye up to it (called Eye Start AF); a real boon for the happy snapper brigade. As expected, the AF is occasionally confused by busy scenes, but a re-directing of the lens and a half press of the shutter button puts things right. In general it performs well enough that the alternative option to flick the side switch to manual, and let your eye be your guide, rarely occurs.
Logically placed to the left of the optical viewfinder on the camera back is the off/on switch. Flick it to on with your eye already to the viewfinder and you're ready to take the first shot within a second or so. Arranged in a vertical row immediately below are four buttons for bringing up the camera's menu folders on screen; activating, switching off or changing the view of the display settings; the last two being the self explanatory trash can and playback buttons.
On the opposite side of the main LCD is a familiar four-way control dial for tabbing through and affecting change to settings or images. Above the dial is a histogram graphic, which can be called up in playback mode to reveal the areas of brightness across an image, while below is one that suggests the ability to rotate captured landscapes to portrait ratio and vice versa. Tilt the camera on its side and the shooting info on the LCD automatically rotates through 90� with you. Just below the dial sits a rubber flap covering a port for a remote release cable, while just right of this is the Super SteadyShot on/off switch. Like the main power switch it requires a reassuringly firm flick of the thumb, meaning that accidental activation or deactivation isn't a problem.
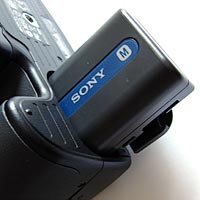
Above the SteadyShot switch is a slight curve/indentation to the back of the body, allowing a comfortable resting position for the thumb when gripping the camera, while the indentations on the rubberized front of the grip � which houses both card (at the side) and chunky info lithium NP-FM55H battery (at the base) � means that it won't easily slip from your grasp in the heat of the action. Incidentally, Sony claims that battery is good for up to 750 shots when charged. Impressive.
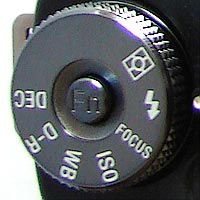
| Function Dial | Exposure Compensation Button / AEL Button |
 |
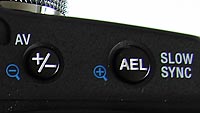 |
Just above the slope at the back are two buttons for adjusting and locking exposure in capture mode, which, in playback, double up as a means of zooming in and out to assess the fidelity of captured images. The former, in conjunction with the single control dial above the grip to the front, allows on the fly adjustment of exposure (-/+2 EV), with sliding scale shown on the LCD. In manual mode, holding down the latter allows exposure to continually shift as you change composition. Furthermore, holding down the AEL button with flash activated allows on-the-fly access to slow sync shooting.
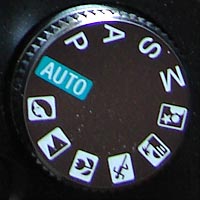
Moving to the top of the camera proper, we find a mode dial sitting to the right of the pop-up flash housing. I say 'pop up' as that's what it resembles, although the flash has in fact to be opened by hand. Ranged around the mode dial are full auto capture, program auto, aperture priority, shutter priority, manual exposure mode, and pre-set modes for five common scenes: night portrait/view, sunset, sports/action, macro/close ups, landscapes and portrait. To the right of this is a drive button that accesses self-timer or continuous shooting mode of up to a maximum three frames per second. Not enough for the pro perhaps, but sufficient spec for the amateur. The number of continuous sequential shots possible is limited only by the available memory when shooting Standard or Fine JPEG, but drops to three images when shooting RAW+JPEG or six when shooting purely RAW. The same multi function button also allows exposure bracketing of a default +/- 3.0EV or, if wished +/- 0.7EV, shooting a brace of three images with a single press of the shutter. It also does the same for colour temperature/white balance, automatically delivering three bracketed shots that range from pale, to natural to vivid.
Just forward of these controls, set on a slight incline while itself being slightly raised, is the all-important shutter button. Forward of this is the previously mentioned control dial. Both readily fall under the forefinger. And, though some may decry the fact there's not a second vertically ranged control dial for ergonomic convenience when shooting portrait fashion, the Alpha's target audience won't miss it. The shutter sound is also a tad loud compared with other budget DSLRs, which may deter some from using it for candids, but at least its definitive sound confirms for the less experienced user that the shot has actually been taken.
On the opposite side of the housing for the built-in flash, which includes a slip off plastic cover for the accessory shoe, and mirroring the mode dial in size, is a function dial. In the absence of that second LCD display, and to avoid slowing down operation by otherwise delving through menus on the main screen, this dial allows quick access to key functions such as flash modes, ISO, white balance, focus (adjusting the AF area between wide, spot or any of the nine points; you can also choose between single shot, continuous or direct manual AF), plus metering modes (multi, centre-weighted and spot). Choices are made by holding down a function button in the centre of the dial, and in conjunction tabbing through the resultant options on the LCD.
The final two settings on the function dial are rather more interesting. The first is for Sony's D-Range (Dynamic Range) Optimiser, which in default mode adjusts brightness or contrast across the whole scene and is claimed to be particularly effective for high contrast, backlit scenes. I was initially confused about why this setting seemed to mark no noticeable change, before delving into the guide confirmed there was no effect when shooting JPEG alongside RAW (or, of course, RAW itself). The second, final setting is marked 'DEC' and denotes the colour mode, which rather like an in-camera image editor, allows images to be captured more vividly, in black and white or Adobe RGB, as well as still affording alternative access to the pre-optimised scene settings (excepting sports/action or macro mode), even when the mode dial is otherwise turned to the PASM settings (it's not accessible when turned to the auto default).
Finally, down the left hand aide of the body are a DC-in port for a mains power adaptor, a slider for switching between auto and manual focus, and, by the lens mount, the lens release button. Which brings us to the menu screens, accessible via the Alpha's LCD. As expected from a Sony digital camera, these are cleanly and logically structured. Automatically on constant display in all shooting modes are the selected ISO sensitivity, the exposure value, image quality, remaining battery life and picture counter, chosen metering, AF area and mode, shutter speed and aperture, plus colour mode.
| Battery Compartment | Memory Card Slot |
 |
 |
In all but manual, the default D-Range Optimiser logo is also shown. As mentioned already, this display of essential settings flips 90� when the camera is turned on its side, but further, supplementary screens � accessed via a press of the menu button � do not offer the same convenience. Turning the mode dial to any setting and pressing 'menu' brings up a couple of on-screen folders containing camera settings. The first lets you set image size and quality, as well as adjust the timings for the instant playback feature (whereby the captured image pops up briefly on screen for assessment, without you having to switch to playback). You can also turn the camera's noise reduction system on or off (I left it on), and likewise that nifty eye start AF feature. The second folder provides the option to activate red eye control, and alter the default flash setting, the order of bracketed shots, or reset all.
Still in auto mode, you've also got the option to tab across to two further playback menus, plus a custom and set up menu. The first allows you to delete already marked images, protect them or format the card, plus access slideshow and DPOF settings. Custom menu number one allows fine tuning of priority set up for the shutter release � giving users the ability, if wished, to take a spur-of-the-moment shot even when focus is unconfirmed; switch the function of the AE lock button so that it works only when the button is held down, or is activated/deactivated with each subsequent press; change the function of the control dial in Program or Manual modes to alter either aperture or shutter speed; tweak exposure compensation performed when the flash is used, plus turn the handy AF illuminator on or off.
The second custom menu allows you to set the shutter to lock either when there's no card inserted in the camera or, if you're really stupid, no lens is mounted, plus alter the duration for which the focus frame glows red in the viewfinder when the shutter button is pressed halfway. You can also set the LCD monitor to switch off automatically when you bring your eye to the viewfinder, or turn off the feature that rotates the display when you turn the camera. Likewise, the correct orientation of recorded images (so an image taken portrait fashion is displayed portrait fashion) can be switched on or off.
Which brings us to the set up menu. This is sub-divided into three separate menus. The first menu allows the adjustment of LCD brightness, the USB setting � so it's either recognized as a mass storage device when connecting to a computer, or starts firing off prints when connected to a PictBridge compatible device � plus video output (NTSC/PAL), audio, language ad time and date settings. The second set up menu selects the method by which file numbers are assigned to images (sequentially, or reset every time a folder or recording date changes) plus allows the selection and creation of image folders themselves. The third set up menu really gets to the nitty gritty, by which I mean you can alter the duration for which recording info is displayed on the LCD; the amount of time the camera can be left inactive before it automatically goes into power save mode; alter the default setting � so not the first menu screen but the previous one selected is shown � plus speed up the deletion of images so that 'yes' is highlighted every time the camera asks for confirmation (the default being 'no'). There's also a 'Clean CCD' setting found here, should you need to resort to a blower brush, in conjunction with the anti-dust setting, to blow away intrusive nasties.
Despite the fairly comprehensive nature of the above, the Sony Alpha 100 is actually surprisingly easy to use, and those who just want to point and shoot and let the camera do the rest can do just that. In general, and as you'd expect from an SLR, the Alpha is fast and responsive in operation � thanks in part to its internal Bionz image processor (why not go the whole hog and call it 'bionic'?) � making using it in general a hassle free affair. The vivid cinnabar ring that surrounds the lens mount is beginning to look like Sony's own ring of confidence�
|
![]() PhotographyBLOG
is a member of the DIWA
organisation. Our test results for the Sony A100 have been
submitted to DIWA
for comparison with test results for different samples of
the same camera model supplied by other DIWA
member sites.
PhotographyBLOG
is a member of the DIWA
organisation. Our test results for the Sony A100 have been
submitted to DIWA
for comparison with test results for different samples of
the same camera model supplied by other DIWA
member sites.