Sony A900 Review
Review Date: January 26th 2009
Author: Zoltan Arva-Toth
Leave a comment about this Review
|
Introduction
Boasting no less than 24.6 megapixels, the Sony Alpha DSLR-A900 is the highest-resolution digital SLR in the world, and also the first "full-frame" digital camera with an anti-shake function integrated into the body. Other highlights include a huge and very bright optical TTL viewfinder, user interchangeable focusing screens, maximum shutter speed of 1/8000s, x-sync speed of 1/250s, continuous shooting speed of 5 frames per second, 9+10 auto-focus points, AF micro adjustment, mirror lock-up, Intelligent Preview, Advanced D-Range Optimiser and a very useful Manual Exposure Shift (ME Shift) function. With a recommended retail price of $3,000 / 2800 Euros / �2100, the Sony A900 is in direct competition with the Canon EOS 5D Mark II and the Nikon D3, both of which have already earned our highest Essential! rating. Can the Sony A900 follow suit? Zoltan Arva-Toth finds out...
Compare Prices
Support PhotographyBLOG: Buy the Sony A900 from one of our affiliate retailers:Ease of Use
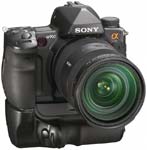
Upon taking the Sony A900 in your hands for the first time, you immediately notice how well built it is, and how the large, carefully sculpted grip fits your hand like a glove. Weighing in at just under 930 grams with a battery � and 850 grams without one � the body itself is not particularly heavy for a full-frame camera, being roughly in the same ballpark as some high-end DSLRs with considerably smaller sensors, such as the Nikon D300. Couple it with a high-quality, fast zoom lens capable of projecting an image circle large enough for its 36x24mm sensor, though, and you'll soon find that the resulting combo can be tiring to carry around all day.
Anyone who has ever handled a Sony A700 will feel right at home with the A900, as the control layout is almost exactly the same. The Drive Mode button has been moved to be in line with the Exposure Compensation button and to make room for a small status LCD, the scene modes have vanished from the mode dial � which is no longer mounted at a slant � the Minolta-legacy grip sensor has been omitted and the position of the Pontor-Compur flash sync terminal has been altered somewhat, but that's it, really. Every lever, button, knob, wheel and switch is exactly where you would find it on an A700, and the highly useful rear joystick has also been retained.
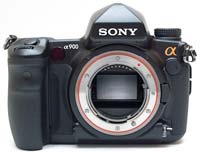
If there is one thing that makes the Sony A900 easy to distinguish from the A700 � or indeed any modern SLR � in terms of its appearance, it has got to be the prism hump. Not only is it huge, even by full-frame standards, it also looks as if it came from the 1960s or 1970s, with the edges being only minimally rounded. It also hints at what you can expect when looking through the viewfinder � but it's something you cannot fully prepare yourself for. The finder of the A900 is both huge and very bright, better than anything I've seen, excepting, perhaps, the Leica S2 shown at Photokina 2008. In use, I have found that it also lived up to the 100% coverage claim made by Sony.
The focusing screen is user interchangeable, with Sony currently offering two extra options over the one that ships with the camera. Type M is somewhat dimmer but promises a better separation of what is in focus and what is not, whereas Type L is a grid screen. The former caters to those who like to or have to use manual focusing on a regular basis, whereas the second can make life easier for architecture photographers, although this latter group would possibly have been better served by on-demand grid-lines than a separately sold focusing screen. By way of the Setup menu, you can tell the camera about which type of screen you are using, which is important because the properties of the focusing screen can have an influence on the metering.
On the Sony A900's standard, factory installed Type G screen, there are a number of markings. Most importantly, the positions of the 9 primary auto-focus points are permanently engraved. The active AF point lights up in red at a half press of the shutter release and whenever it is being changed. The number of primary AF points is sufficient, but their arrangement leaves a lot to be desired. Instead of being positioned in accordance with either the Rule of Thirds or the Golden Mean, the 9 main AF sensors are grouped together in the central area of the frame, forming a diamond shape. In Local AF Area mode you can select, by way of the rear joystick, which one of these should be used to obtain focus. In use, the joystick proved to be just the right tool for AF point selection, much better than the dials and navigation pads employed by other manufacturers.
Focusing was admirably quick and almost silent with the Carl Zeiss Vario Sonnar T* 24-70mm f/2.8 SSM lens, especially when the centre point was selected. The central AF sensor is a double cross type, which is great for almost any type of subject, but the other 8 primary AF sensors are of the line type, sensitive to either horizontal or vertical detail, but not both. For this reason, the use of these AF sensors caused the lens to hunt for focus on a number of occasions. Finally, there are 10 "supplementary ranging points" used by the camera in Wide AF Area mode. None of these is marked on the focusing screen, and none is user selectable. They are used by the camera to track subjects as they move across the frame, provided the auto-focus mode is set to Continuous by way of the mechanical AF mode selector located on the left front of the camera, a control which is thankfully not very prone to being moved by accident.
The other markings on the focusing screen include the spot metering area and the frame boundaries for when shooting in wide-screen or APS-C formats. When a DT lens, whose image circle is not large enough for the full-frame sensor, is mounted to the camera, the Sony A900 enters APS-C mode automatically, but if you want to use this mode when a lens with full frame coverage is attached, you need to select this mode manually from the menu. In APS-C mode, only the central 11 megapixels are used. Note that the unused parts of the frame are not masked out in the viewfinder the way they are in a Nikon D3, for instance, so you need to keep an eye on those boundary markings when composing the shot.
 |
 |
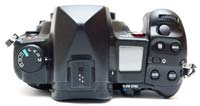
| Front | Rear |
The viewfinder status bar is in a traditional place just beneath the finder. This bar is a fairly conventional affair, meaning it does not show the sensitivity, the drive mode or the white balance setting, except when they are being changed. However, there is one indicator that is unique to Konica Minolta and Sony � one that shows how intensively the Anti Shake mechanism (now called SteadyShot INSIDE) is working. Sony were lucky to have inherited this sensor-shift image stabilisation technology from Konica Minolta when they bought that company's camera division, as they could lift it from the Konica Minolta Dynax 7D and 5D models and implement it in the A100 and its successors without much ado.
For the A900, however, the technology had to be tweaked, as its sensor is much bigger and heavier than that of those cameras. Many thought it would be impossible to make this kind of stabilisation work in a full-frame body, but Sony's engineers have done a good job, as demonstrated in the Image Quality section of this review. One disadvantage of this system as opposed to the lens-based solutions of Canon, Nikon and Panasonic is that you do not see the stabilisation effect in the viewfinder. This is why the SteadyShot indicator can come in handy � by keeping an eye on it, you can press the shutter release at the right moment, when camera shake is at its lowest.
While we are at it, we have to mention that where other manufacturers use a specially designed filter in front of the sensor, which can vibrate at ultra-high frequencies to shake off any non-adhesive dust particles that may have settled on it after a lens change; Sony keep trying to kill two birds with one stone by moving the sensor itself to get rid of dust, using the same technology that was developed for the Anti Shake system. Since human hands holding a camera tend not to tremble at a frequency of tens of thousands of kilohertz, it is very hard to believe that a solution developed to combat motion blur resulting from shaky hands can successfully double as a sensor dust buster. And indeed, if you look at our Sample Images, you will easily find a number of dust spots, particularly visible when they appear in homogeneous areas such as open patches of sky, especially in photographs taken at apertures of f/11 or smaller. Therefore you'll still need to invest in some kind of third-party sensor cleaning solution to keep the image sensor completely free of unwanted dust.
In terms of exposure control, the Sony A900 offers almost everything a photographer may need. Three metering modes are available, multi-segment, centre-weighted and spot; accessible by way of a handy three-way knob, just like on the A700, and very much like the old Konica Minolta Dynax 7D, the camera which the A700 and the A900 take many of their design cues from. In multi-segment metering mode, the A900 appears to be fairly conservative, aiming to avoid any blown highlights. This could theoretically lead to the underexposure of the midtones and the shadows in certain conditions � but thanks to the rather wide highlight range of the A900 and the D-Range Optimiser, this is rarely the case in practice. Centre-weighted and spot metering work the way they should and, as noted above, the spot metering circle is clearly marked on the focusing screen.
Setting the main exposure variables of aperture and shutter speed is easy thanks to the dual control wheels of the Sony A900, but the button used to directly access the ISO speeds is located somewhat inconveniently. The P/A/S/M exposure modes are selectable by way of a traditional mode dial, which is refreshingly free of any scene modes or "digital subject programs". In light of this and the camera's intended target group, it is somewhat surprising to see the "green" Auto mode retained. The mode dial is also used to access up to three personalised combinations of your favourite settings � nice!
As befits a camera intended for serious use, the A900 has an autoexposure lock (AE Lock) function, with a button dedicated to it. Apart from locking the exposure in P, A and S modes, this button is also used for activating the very useful Manual Exposure Shift (ME Shift) function in manual exposure mode. ME Shift is similar to the Program AE Shift function found on many cameras � including the A900 itself - but is not dependent on the internal meter, which makes it better suited to shooting in constant lighting conditions. ME Shift makes it easy to keep the exposure value constant when quickly changing the shutter speed or aperture, and should be a standard feature on every serious camera in my view.
 |
 |
| Front | Top |
When designing the A900, Sony have apparently shied away from any technology or feature anyone has ever spoken of in a disapproving manner. Thus the camera lacks a pop-up flash, Live View and Eye-start AF. The omission of these � or at least the first two � is a pity. The lack of a pop-up flash, for instance, means that if you want to take advantage of the A900's ability to wirelessly control off-camera system flashes, you will have to buy one of the new HVL-F58AM flashguns to act as commander, irrespective of how many earlier WL capable Minolta/Sony flash units you have already. Not that the HVL-F58AM is a bad investment. With its innovative Quick Shift Bounce system, it is certainly an interesting and capable flash � but it does set you back at least �375 on top of what you have to pay for the A900 body.
Speaking of flash, the Sony A900 has both a standard Pontor-Compur flash sync terminal and a non-standard hot-shoe. The former is meant to be used with studio strobes, but can also serve to sync up old cable-contact flashguns with the A900, as illustrated by one of the shots in the Design section of this review. The latter is the odd proprietary hot-shoe inherited from Minolta. Unlike other DSLRs, which typically allow the use of non-dedicated flash units in Auto or Manual � though obviously not TTL � mode, the A900 and other Sony DSLRs only accept flashguns tailor-made to their peculiar hot-shoe. This also means that you cannot use Pocket Wizards or other typical hotshoe-mounted accessories either, unless you buy a separately sold adapter. Since I happened to have access to a Minolta-dedicated Sunpak M440AF-MX flash, I fitted it on the A900 to see how it worked (to see what the combo looked like, again please head to the Design section). It performed admirably, producing remarkably consistent exposures even when bounced off the ceiling.
The omission of Live View is probably also down to Sony's intention of marketing the A900 as a serious camera for the traditionalist photographer � but those using the camera on a tripod will likely miss it. The A900 does offer an 'Intelligent Preview' feature which, if enabled, allows the camera to capture a low-res image at a press of the DOF preview button, which it then displays, and lets the photographer preview the effect of any changes made to the overall exposure, the white balance or the D-Range Optimiser. Crucially, you cannot magnify into this preview image to check focus accuracy and neither can you save it on the card. Intelligent Preview can thus be somewhat helpful when photographing static subjects, but is no substitute for Live View. To be fair though, those who predominantly use their cameras hand held � which is quite possibly the majority � are unlikely to mind this ommission.
With no Live View � and no video for it � the big and ultra-high-resolution rear LCD is used only as an � interactive � status screen and menu display in Record mode. As a status screen, it really excels, showing all important settings, and allowing you to change them by way of the Fn button and the rear-panel joystick; the latter of which does not only move up, right, down and left, but can also be pressed inwards to confirm a settings change. When the camera is rotated to portrait orientation, the information display adjusts itself accordingly, which is again something we first saw in the Konica Minolta Dynax 7D of 2004. There are two eye proximity sensors below the optical viewfinder, which, upon sensing that you have raised the camera up to your eye, send a signal to the camera to turn off the rear LCD, so that it does not disturb you. The A900 also has a conventional monochromatic top-panel status LCD, but it is unusually small � the huge prism and the large top-plate buttons take up a lot of space � which means that the range of information presented by it is fairly limited. In dark conditions, it lights up in orange upon a press of a dedicated button.
The A900 has a fairly comprehensive set of drive mode options, accessed by way of a dedicated button located just behind the shutter release and right of the exposure compensation button. Single frame advance is self-explanatory, whilst continuous shooting can be set to either 3fps or 5fps by way of the rear control wheel. The latter figure is very high for such a high-resolution camera, more than 20% faster than the Canon EOS 5D Mark II, for instance. The self-timer can be set to either 10 seconds or 2 seconds, the latter of which is smartly combined with mirror lock up (MLU).
If, for whatever reason, you want more than two seconds to pass between mirror up and taking the shot, you can also select MLU as a separate drive mode. In this case, a first press of the shutter release raises the mirror, and a second one opens the shutter. Although this can be done by physically pressing the shutter release button twice, it kind of beats the point of MLU, so the use of a cable release is recommended. The shutter of the A900 is not particularly loud, but of course the mirror slap is � it's a big mirror after all. Other drive mode options include AE/WB/DRO bracketing and a separate mode for when using the supplied infrared remote controller. This unit has a surprising number of buttons, but only a couple of these are relevant in Record mode. One gripe I have about the infrared remote release is that you cannot use it with MLU, since it is a different drive mode � so, as noted above, you will want to buy a wired remote release if you do a lot of tripod work.
 |
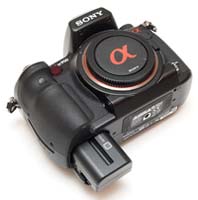 |
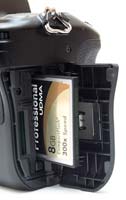
| Memory Card Slot | Battery Compartment |
The white balance options are also accessible via a dedicated button. These include the usual range of presets, all of which can be fine-tuned in 10-Mired increments. In addition to these, you can set the colour temperature in degrees Kelvin, between 2500K and 9900K, as well as make adjustments along the green-magenta axis using simulated colour compensation filters. Naturally for a high-end digital camera, a Custom WB option is also provided, and there is the ubiquitous AWB setting available too.
There is one last feature worth expanding upon, AF Micro adjustment. Just like other manufacturers, Sony have acknowledged that certain camera-lens combinations may cause the AF system to front- or backfocus, and provided an on-board solution to this. In-camera AF Micro adjustment alleviates the need to send your camera and lenses in a repair centre upon encountering front- or backfocus. It has to be noted though that AF Micro adjustment is not a simple task and demands a high degree of precision from the person doing it. Otherwise you can do more harm than good.
Once you have captured a photo, the true qualities of that hi-res rear LCD can be admired in their full glory. Displaying the image just captured takes some time � about a second � as the files are huge. You can magnify into the photo by pressing the button left of the rear control wheel. This again takes a bit of time, but it's worth it. The default magnification for full-resolution images is 9.4x, which is perfect for judging focus � which is why I didn't usually bother to magnify into the photos any further, although if you wish, you can do so, up to 19x. You can move around the frame in enlarged view by way of the joystick, and return to normal viewing via the same button used to enter it, or the Playback button.
As usual, the DISP button is used to cycle through the various information screens, but what's not so usual � except if you are coming from an A700 � is that there is a dedicated button to bring up the the four-way histogram and shooting data. This I found immensely useful, as it allowed me to quickly toggle between full-frame view with no data overlay and histogram view with all the necessary shooting info, without having to cycle through the other screens. All digital cameras should have a dedicated Histogram button like this (in Record mode, the function of this button can be tailored to your needs � my choice would be either Flash Mode or Flash Exposure Compensation).
The A900 runs on a proprietary Lithium-ion battery bearing the InfoLITHIUM trademark. What this means is that the battery can report exactly how much power is left in it, and the camera displays this in percentage form. In the field, this was invaluable information, much better than the limited-use pictographs displayed by most other digital cameras. Sony rates this battery at around 880 shots per cycle according to the CIPA standard. Either I chimp too much or this figure is too optimistic � I barely managed half of that. The battery slots into place via a door on the bottom of the camera, and is cleverly protected by a lock lever from accidentally falling out.
The A900 records photos on Compact Flash and Memory Stick Duo cards, each of which has its own slot in a card compartment that opens to the right-hand side of the camera, when viewed from the back. Having dual card slots is always welcome, but they have very pared-down functionality in the A900. You cannot record images simultaneously on both cards, and neither can you save RAW files on one and JPEGs on the other. You can connect the A900 to an HDTV via its HDMI terminal, but naturally there is a VIDEO OUT/USB port as well for connecting the camera to a regular TV or a computer. The A900 supports USB 2.0 'Hi-Speed', and thanks to this, downloading the images from a fast Lexar Professional UDMA 300x Compact Flash card was really fast despite the extreme amount of data that had to be moved. All connectors are protected with sturdy rubber flaps on proper hinges, so they stay put, whether closed or open. It goes without mention that the A900 has a metal tripod mount aligned perfectly with the lens' optical axis.
In the field, the Sony A900 proved to be a well-crafted, responsive and highly capable photographic tool that was a joy to use. Sony must also be applauded for supplying a manual in print form, which you can take along for quick reference. Of course a PDF version is also provided, which is exemplary in being fully cross referenced. That's all excellent news , but how does the quality of the Sony A900's super-high-resolution images stack up? Read on to find out!
|
![]() PhotographyBLOG
is a member of the DIWA
organisation. Our test results for the Sony A900 have been submitted to DIWA
for comparison with test results for different samples of
the same camera model supplied by other DIWA
member sites.
PhotographyBLOG
is a member of the DIWA
organisation. Our test results for the Sony A900 have been submitted to DIWA
for comparison with test results for different samples of
the same camera model supplied by other DIWA
member sites.