Panasonic Lumix DMC-G1 Review
Review Date: November 25th 2008
Author: Mark Goldstein
Leave a comment about this Review
|
Introduction
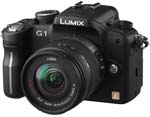
Combining key elements from both a DSLR and a compact, the Panasonic Lumix DMC-G1 is a completely new breed of digital camera - it's officially the World's first ever Micro Four Thirds camera. Primarily targeted at female and older-generation users, the Panasonic G1 is smaller than a regular digital SLR and offers all the point-and-shoot functionality of a compact, providing a more natural upgrade path for people looking to step-up to the next level. Panasonic have taken the Live MOS image sensor from a regular Four Thirds DSLR camera, but replaced the optical viewfinder and mirror assembly with an electronic viewfinder (EVF), resulting in a thinner, smaller body and tiny interchangeable lenses that have to be seen to be believed. There's also a 3-inch swivelling, tilting LCD screen, full-time Live View with contrast auto-focusing, and a a 12.1-megapixel Live MOS sensor. The EVF features a high-resolution 1,440,000 dots, making it the most detailed ever seen on a digital camera, and there's also a built-in Optical Image Stabiliser to help combat camera-shake and a Supersonic Wave Filter to remove unwanted dust. Available in three colours, black, red and blue, for �599 / $799, is the new Panasonic Lumix DMC-G1 the perfect marriage of DSLR and compact? Carry on reading to find out...
Compare Prices
Support PhotographyBLOG: Buy the Panasonic Lumix DMC-G1 from one of our affiliate retailers:Ease of Use
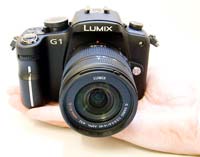
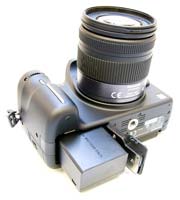
The first thing that strikes you about the Panasonic Lumix DMC-G1 is that it isn't quite as small or light as Panasonic's marketing literature might lead you to believe. Measuring 124 x 83.6x 45.2mm and weighing 385g without a lens attached, it's a little smaller than an Olympus E-420 Four Thirds DSLR (which measures 129.5 x 91 x 53mm), but actually weighs 5g more. Compared to Panasonic's current 20x ultra-zoom compact, the DMC-FZ28 (which measures 117.6 x 75.2 x 88.9 and weighs 370g), the G1 is both bigger and slightly heavier. All of this number-crunching ultimately reveals that Panasonic seem to have resisted the temptation to make the DMC-G1 as small as possible, in order to ensure that users with average-sized hands can still operate it comfortably. I found that I naturally gripped the camera with the thumb, middle and fourth finger of my right hand, whilst operating the shutter button with my fore-finger and supporting either the lens or camera body with my left hand. Available in a choice of red, blue or more serious black, the Panasonic Lumix DMC-G1 is a handsome yet understated camera, with the biggest surprise becoming quickly apparent when you first pick it up. The majority of the body is covered in a tactile rubber compound which I haven't seen used on a camera before. It adds a hard-wearing, protective coating to the G1 and also makes it easy to grip, even with one hand. Overall the DMC-G1 is extremely well-built, with a high quality metal body, lens mount and tripod socket. The only literal weak-point is the memory-card slot door, which I imagine could be easily snapped off.
The Panasonic Lumix DMC-G1 is technically not a DSLR camera (because it doesn't have a mirror), making it the first ever compact camera to feature interchangeable lenses, which happens to be confusingly just like a DSLR. The G1 ships with a 14-45mm kit lens (28-90mm equivalent in 35mm), or in a dual lens kit with the 14-45mm and a 45-200mm lens (90-400mm equivalent in 35mm). While the body of the G1 is comparable in size and weight to other DSLR cameras, the lenses are where Panasonic have really shrunk the overall system. The 14-45mm optic in particular is tiny and very light, and the 45-200mm is also pretty amazing when you consider that it offers an effective focal length of 90-400mm in 35mm terms. Both lenses do extend quite a long way when zoomed to their maximum telephoto settings, but that's a small price to pay for such compact packages. The only downsides from a specification point of view are the relatively slow maximum apertures - f/3.5-5.6 for the 14-45mm lens, and f4-5.6 for the 14-200mm. With the system being so new, these are the only Micro Four Thirds lenses currently available, so you'll have no choice but to use them for the time being. You can use regular Four Thirds lenses via an optional adapter, but lenses that are not compatible with the G1's Contrast AF function can only be used with manual focusing.
Optical image stabilisation is supplied via the lens, rather than being built-in to the camera body. It can be turned on and off via the Mega O.I.S switch on the lens barrel, with three different modes accessible through the DMC-G1's menu system. When enabled, the Panasonic Lumix DMC-G1 automatically compensates for camera shake, which is a slight blurring of the image that typically occurs at slow shutter speeds when the camera is hand held. There are three different modes, Mode 1 is on all the time including image composition, Mode 2 is only on when you press the shutter button, and there's also an Auto mode. In practice I found that it does make a noticeable difference, as shown in the examples on the Image Quality page. You don't notice that the camera is actually doing anything different when anti-shake is turned on, just that you can use slower shutter speeds than normal and still take sharp photos. Thankfully leaving the anti-shake system on didn't negatively affect the battery-life, with the camera managing just over 300 shots using the supplied rechargeable Li-ion battery.
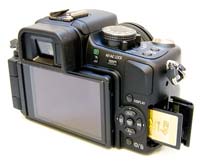
The rear of the Lumix DMC-G1 is dominated by the large 3 inch LCD screen. The rotating, free-angle LCD monitor, which is hinged on the left side of the camera (looking from the rear), can be flipped out and twisted through 270 degrees. You can use the screen as a waist-level viewfinder, holding the camera overhead, and even for turning the G1 on yourself for arm-length self-portraits. There's also the added benefit of folding the screen away against the camera body to protect it when stored in a camera bag, preventing it from becoming marked or scratched. I found that the new 460K pixel, high-resolution screen coped admirably with the majority of lighting conditions. This screen is a great improvement on cameras with the usual 230K dot resolution, even being nice to use in low-light. The Auto Power LCD function automatically detects the current lighting conditions and boosts the LCD backlighting by up to 40% when shooting outdoors in bright sunshine, helping to keep the screen visible. The high-res, free-angle LCD screen is much more than just a novelty - it's a lot more versatile than the usual combination of optical viewfinder and fixed LCD, providing new angles of view and enhancing your overall creativity. Above all, it's a fun way of composing your images.
 |
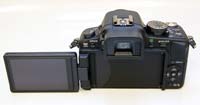 |
| Front | Rear |
Instead of the bulky optical viewfinder of a conventional DSLR, the Panasonic G1 has a smaller electronic viewfinder. The mere mention of an EVF is usually enough to elicit loud groans from any serious photographer, as they have traditionally been poorly implemented in the past, with low-res, grainy displays that were only really suitable for still subjects. Thankfully the electronic viewfinder on the G1 is far better than any previous system. It has a large 1.4x (0.7x on 35mm equiv.) magnification, 100% field of view, and an unprecedented 1,440,000 dot equivalent resolution, resulting in a very usable display that won't leave you cursing. The EVF (and also the main LCD screen) operates at 60fps, twice the usual speed, which helps make it relatively flicker-free (although it is still noticeable).
As the EVF is reading the same signal from the image sensor as the rear LCD screen, it can also display similar information - for example, you can view and operate the G1's Quick Menu, giving quick access to all the key camera settings while it's held up to your eye. The various icons used to represent the camera settings are clear and legible. The icing on the viewing cake is the clever built-in eye sensor, which automatically switches on the viewfinder when you look into it, then switches it off and turns on the LCD monitor when you look away. The main downside of the G1's EVF system occurs indoors in low light, as it has to "gain-up" to produce a usable picture, resulting in a noticeably grainier picture. In all other situations, however, the electronic viewfinder on the G1 is the equal of and in many areas better than a DSLR's optical viewfinder, particularly those found on entry-level models which are typically dim and offer limited scene coverage. The truest testament to the G1 is that I mostly used it by holding it up to eye-level, something that I wouldn't do unless the EVF was of sufficient quality.
As well as the LCD monitor and EVF, the rear of the Panasonic Lumix DMC-G1 has an LVF/LCD button for manually switching between the two viewing methods (useful if you turn the eye sensor off), a Playback button, conveniently located AF/AE Lock button, Display button and a traditional 4-way navigation pad system with Menu/Set button in the centre. Pressing left, up, right and down on the D-Pad buttons selects AF Mode, ISO, White Balance and Function options respectively. The Function button can be configured to activate one of five key settings - I chose metering mode. In shooting mode, the Display button alternates between turning the display off, the main camera settings as icons, no settings at all, and a useful Info Display which shows the current key settings in a clear graphical format. You can additionally press the Q.Menu button and then use the navigation pad to move between the onscreen options. The Delete button intriguingly has a second function - it doubles up as the new Preview button. This very cleverly toggles between showing a live preview of the effects of the current aperture (effectively a digital version of Depth of Field Preview) and the current shutter speed. The latter will prove especially useful for beginners, providing a visible way of checking how different shutter speeds will affect the capture of different subjects - running water is a good example.
Found on top of the Panasonic DMC-G1 are the Focus mode dial, flash hotshoe and built-in pop-up flash, burst mode/bracketing/self-timer switch, on/off switch, and large tactile shutter button. There's also a traditional dial that lets you choose the different exposure modes. The usual selection of Program, Aperture Priority, Shutter Priority, and Manual are available for the more experienced photographers. This dial is a typical feature of SLR cameras, and enables you to quickly change between the various modes. The more beginner-friendly Scene modes and Intelligent Auto are also accessed via this dial. Additionally there is a custom mode, marked CUST, which allows you to configure your favourite settings and quickly access them, and a My Color mode which sets the brightness, saturation and color of the image before you take it. Also on the top of the camera is the Q.Menu button, a very welcome addition which provides quick access to most of the principal controls, including ISO speed, image size, image quality and white balance (there are 14 settings in total). You can still access all of these options from the main menu system too.
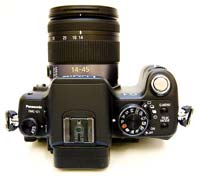 |
 |
| Top | Front |
First introduced on the DMC-FX55 compact camera, the DMC-G1 features an enhanced version of Intelligent Auto mode. Panasonic have tried to make things as easy as possible for the complete beginner by providing this shooting mode, which allows you to point and shoot the camera without having to worry about choosing the right scene mode or settings. Intelligent Auto Mode automatically determines a number of key criteria when taking a picture, including selecting the most appropriate scene mode (from 5 commonly used presets) and ISO speed, and turning face detection (up to 15 faces), image stabilization and quick auto-focus on. The Intelligent Auto Mode now also includes Intelligent Exposure, which increases exposure only in the under-exposed areas of the image, Digital Red-eye, which automatically detects and removes red-eye, and AF Tracking, which continually tracks a moving subject and keeps it in focus, without you having to hold the shutter button halfway down as on most other cameras. Intelligent Exposure and Digital Red-eye can also be turned on in the other shooting modes via the main menu.
In practice the Intelligent Auto Mode system works very well, with the G1 seamlessly choosing the most appropriate combination of settings for the current situation. The 5 available scene modes are Portrait, Landscape, Macro, Night Portrait and Night Scenery, so obviously not all situations are covered by Intelligent Auto Mode, but it does work for the majority of the time. It makes it possible for the less experienced photographer to easily take well-exposed, sharp pictures of people, scenery and close-ups by simply pointing and shooting the camera. Also catering for the beginner are a total of 10 different scene modes.
In a throwback to the days before digital took over the world, the top of the G1 also offers a Film Mode, with 6 colour types and 3 types of monochrome to choose from. This applies to both JPEG and RAW files, so you can effectively shoot a black and white RAW file, for example, out of the camera if you wish (although I'm not sure why you'd want to...). As you select a different Film Mode, the effects can clearly be seen on the LCD screen. In addition, you can change the contrast, sharpness, noise reduction and saturation levels for each one, and even create 2 custom modes of your own. The Multi Film option takes up to three consecutive images using different Film Mode settings (this doesn't work in RAW mode though).
On the front of the Panasonic Lumix DMC-G1 is the small focus-assist and self-timer indicator lamp, lens release button, lens mount, rubberised hand-grip, and most important of all, the front control dial. This is used for, amongst other things, changing the aperture and shutter speed by turning from left to right and back again. As with the shooting mode dial, this is a common feature found on DSLR cameras, so you'll be right at home if you've used any DSLR before - compact camera users will need to get used to using this dial, although it is possible (but rather long-winded) to set aperture/shutter speed via the LCD screen. The control dial can also be pressed in to switch to setting the exposure compensation. Whilst this is a useful addition, the ease with which it can be pressed in resulted in quite a few photos where I inadvertently set the exposure incorrectly, rather than setting the aperture which I though I was actually doing!
Unlike a conventional DSLR camera which uses a phase detection auto-focus system, the DMC-G1 employs the same Contrast AF that is commonly used by compact cameras. As with the EVF, experienced photographers will now be tutting loudly at the thought of having to use a traditionally slower system. I'm happy to be able to report that this decision hasn't resulted in a slow and unpredictable AF - quite the contrary in fact. Panasonic have published marketing data which suggests that the G1's AF is as fast, if not faster, than a typical DSLR camera's, and in practice I noticed very little difference in speed between the G1, the new Pentax K-m (also on test at the same time) and my own Canon EOS 5D. Even more surprisingly, there were also very few occasions when the G1 failed to lock onto the subject, especially when using the centre AF point. There are a wide range of AF modes on offer, including multiple-area AF with up to 23 focus areas, 1-area AF with a selectable focus area, Face Detection, and AF Tracking. The G1 also has a useful Quick AF function that begins focusing as soon as you point the camera.
 |
 |
| Memory Card Slot | Battery Compartment |
On the bottom of the Panasonic DMC-G1 is the metal tripod socket, importantly in-line with the middle of the lens barrel, and the battery compartment, and on the right side is the SD/SDHC memory card slot. On the left is the Remote socket for use with the optional remote shutter release, and two connection ports, including a HDMI port for connecting the G1 to a HD television or monitor. Unfortunately, Panasonic have decided to cut costs and not include a HDMI cable as standard in the box, which means that you'll have to purchase one separately to take advantage of this camera's HD connectivity.
The main menu system on the DMC-G1 is straight-forward to use and is accessed by pressing the Menu/Set button in the middle of the navigation D-Pad. There are five main menus, Record, Custom, Setup, My Menu and Playback. Most of the camera's main options, such as white balance, image quality, auto-focus mode and ISO speed, are accessed here, so the Record menu has 19 options spread over 4 screens, and the Setup menu has 20 options over 4 screens. As an indication of how configurable the G1 is, the Custom menu has 21 different options, allowing you fine-tune this camera to suit your way of working. As mentioned previously, the addition of the Q.Menu button on the top of the camera speeds up access to some of the more commonly used options. Due to the large LCD screen and restricting the number of on-screen choices to five, the various options and icons are clear and legible. If you have never used a digital camera before, or you're upgrading from a more basic model, reading the easy-to-follow manual before you start is a good idea. Thankfully Panasonic have chosen to supply it in printed format, rather than as a PDF on a CD, so you can also carry it with you.
The start-up time from turning the Lumix DMC-G1 on to being ready to take a photo is very impressive at less than 0.5 seconds. The Contrast Auto-Focusing system is quick in good light and the camera achieves focus most of the time indoors or in low-light situations, helped by the AF assist lamp - the G1 doesn't have any notable problems locking onto the subject in low-light situations. The visibility and refresh rate of the 3 inch LCD screen are very good, and the pixel count of 460,000 is excellent, with virtually no visible grain. It takes about 1 second to store a JPEG image, allowing you to keep shooting as they are being recorded onto the memory card - there is a barely perceptible LCD blackout between each image. Storing a single RAW image takes around 5 seconds, but thankfully it doesn't lock up the camera in any way - you can use the menu system or shoot another image while the first file is being written to memory. The Panasonic Lumix DMC-G1 has a pretty standard Burst mode which enables you to take 3 frames per second for an unlimited number of JPEG images at the highest image quality, or 7 RAW images. Overall the Panasonic Lumix DMC-G1 is about average in terms of operational speed compared to a DSLR, but much faster than a lot of compacts.
Once you have captured a photo, the Panasonic Lumix DMC-G1 has an average range of options when it comes to playing, reviewing and managing your images. You can instantly scroll through the images that you have taken, view thumbnails (up to 30 onscreen at the same time and in a Calendar view), zoom in and out up to 16x magnification, view slideshows, delete, protect, trim, resize, copy and rotate an image. You can also select favourite images, change an image's aspect ratio, and set the print order. The Display button toggles detailed settings information about each picture on and off, such as the ISO rating and aperture / shutter speed, and there is a small brightness histogram available during shooting and RGBY histogram during playback.
In summary the Panasonic Lumix DMC-G1 is the first of a completely new breed of digital camera that actually gets most things right in terms of usability and ergonomics. So how does it fare when it comes to image quality?
|
![]() PhotographyBLOG
is a member of the DIWA
organisation. Our test results for the Panasonic Lumix DMC-G1 have
been submitted to DIWA
for comparison with test results for different samples of
the same camera model supplied by other DIWA
member sites.
PhotographyBLOG
is a member of the DIWA
organisation. Our test results for the Panasonic Lumix DMC-G1 have
been submitted to DIWA
for comparison with test results for different samples of
the same camera model supplied by other DIWA
member sites.