Canon Powershot A580 Review
Review Date: May 19th 2008
Author: Zoltan Arva-Toth
Leave a comment about this Review
|
Introduction
Compare Prices
Support PhotographyBLOG: Buy the Canon Powershot A580 from one of our affiliate retailers:Ease of Use
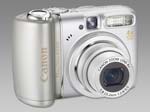
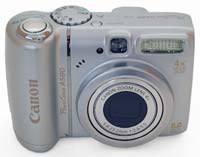
The Canon PowerShot A580 is a plastic, entry-level camera of compact dimensions. While not quite as tiny as the Digital IXUS models that we've recently reviewed, it is still on the small side � in fact smaller and lighter than the battery charger of many a DSLR. This means it will comfortably fit into a moderately sized neck- or belt-pouch and can be carried along all day without ever becoming a burden. Like many � though not all � PowerShot A series digicams that came before it, the A580 features a prominent hand-grip. Given the camera's small size, the grip cannot possibly accommodate all of your fingers, but it does enable you to hold it securely. The good weight distribution and the sensible control layout make one-handed operation problem-free in most situations, although you are always welcome to use your left hand for additional support.
The front of the PowerShot A580 is dominated by the protruding 4x zoom lens, which is apparently inherited from earlier A series models. The zoom is motorised and spans focal lengths ranging from 5.8mm to 23.2mm. Given that the length of the diagonal of the A580's CCD is roughly 1/6 of that of a typical frame on 35mm film, the angle-of-view range of this lens is equivalent to that of a 35-140mm optic mounted to a 35mm camera. Unlike in the case of the A580's sibling, the A590IS, you cannot attach conversion lenses or filters to the lens (the LA-DC52G conversion lens adapter won't fit). The camera sports an on-board flash but no hot-shoe, so the only way to sync up an external flashgun with it is to optically slave it to the built-in unit. Canon themselves recommend the separately sold HF-DC1, which comes complete with a small flash bracket but can also be hand-held or mounted on a light stand. Third-party alternatives are available too.
The camera has a plastic tripod socket, which is not aligned with the lens' optical axis. While this would be a cause for concern on a more advanced camera, it is acceptable on an entry-level model, as the target consumer is not likely to engage in nodal-point panoramic shooting or indeed heavy tripod use of any kind. This camera is powered by a pair of AA sized batteries that can be loaded via an opening in the bottom plate. The battery compartment door has an interlock that prevents it from accidentally springing open. I have found it a bit awkward to use, but manageable. The same compartment houses the memory card slot, which accepts SD, SDHC, MMC, MMC+ and HC MMC+ cards.
On the top of the Canon PowerShot A580, you will find the on/off button, the mode dial and the zoom lever, with the shutter release button sitting in the middle of the latter. The mode dial inspires confidence with its solid action � it's next to impossible to spin it unintentionally, and that is a very good thing. There are ten icons on this dial, but the first thing you will notice is the absence of what you would expect to be there. Most of the A series models that have a mode dial offer the full range of P, A, Tv and M modes in what Canon terms the �Creative Zone�. On the A580, this zone is restricted to a single mode marked by the combination of a camera symbol and a capital M, an icon borrowed from the Digital IXUS line. Out of the traditional �creative modes�, this one most closely resembles P. In other words the A580 � like its immediate predecessors the A550 and the A560, but unlike most of the other cameras in the A series � fails to provide direct access to aperture and shutter speed; an important limitation to keep in mind as we go about exploring its capabilities. Next to this �Camera M' icon are the pictographs of the two automatic modes, one of which is the standard �green� Auto mode, with the other one being a new �Easy' mode. The control dial also has an �Image Zone�, including separate icons for the five most commonly used scene modes plus one setting labeled SCN for seven additional �special scenes�. The last pictograph marks the mode dedicated to capturing movie clips.
The rear of the PowerShot A580 features a few more controls but is still not overloaded with them. In the top right corner is a sliding switch used to toggle between Record and Playback. Below it is the Print/Share button which, by default, is only active when the camera is connected to a computer or a direct print compatible printer. However, this button can be customised to perform one of eight commonly used functions, out of which Exposure Compensation and Custom White Balance make the most sense. The other rear controls include the four-way pad with direct access to ISO, Flash Mode, Drive Mode and Macro Mode. The latter is really a focus limiter for the lens � if set to Macro, the AF is limited to the 5cm-45cm range at wide angle and 30cm-45cm at telephoto. If set to Normal, it will look for subjects in the 45cm-infinity range. In the middle of the four-way pad is the FUNC/SET button, which is used to bring up a control panel in most shooting modes, and to confirm settings. The two remaining back-panel buttons are DISP and MENU, the former of which cycles through the various information screens in both Record and Playback, while the latter will, unsurprisingly, bring up the main menu screen in all shooting modes except Easy.
 |
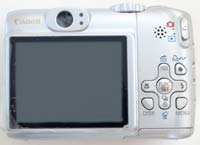 |
| Front of the Camera | Rear of the Camera |
When describing the mode dial, we already touched upon the available shooting modes briefly, but they deserve to be explored in a bit more depth, starting with the simplest one. Labeled with a heart, the Easy mode is new to the PowerShot A580, in as much as the A560 did not have it. This is kind of a �safe� mode, in which the user gets no access to any setting except a couple of flash modes. Apart from framing, zooming, focusing, shooting and reviewing the images captured, the only thing the photographer can do is decide whether to leave the flash on Auto or to turn it off. Therefore all back-panel buttons except Flash Mode are idle when recording images in this mode, making �Easy' the ideal choice when handing the camera over to someone who is not familiar with it. The Auto mode still offers limited control, but you can specify the pixel count and the quality level � Superfine, Fine or Normal � via the FUNC/SET button, as well as choose between Auto ISO and HI. With the former, you limit the camera's choice of ISO to the lower sensitivity settings, while with the latter you permit it to use higher values if deemed necessary. Other important settings you gain access to include AF mode, AF range (Normal/Macro), Self Timer, Red Eye Correction and Display Overlay.
The Portrait, Landscape, Night Snapshot, Kids&Pets and Indoor scene modes, directly accessible via the mode dial, enable the photographer to inform the camera about what type of subject it is supposed to take a photo of, thereby increasing the chance that focus, exposure, white balance, depth of field etc. are optimised for that particular subject. Furthermore, they provide some extra control options for the person behind the camera, most notably exposure compensation � normally accessed via the control panel activated by the FUNC/SET button, but customisable to the Print/Share button � as well as Continuous Shooting and all flash modes including Forced On. Sunset, Night Scene, Foliage, Snow, Beach, Fireworks, Aquarium are all found under the SCN setting of the mode dial, and can be selected on the control panel accessed via the FUNC/SET button.
Although the user guide refers to a �manual� mode, this is, as mentioned earlier, essentially a P mode with no direct access to aperture and shutter speed, and no Program AE Shift function either. It does, however, provide some extra control in addition to what is available in the scene modes, including a choice of preset white balance settings, a custom WB option � which can be mapped unto the Print/Share button if desired, via the menu �, access to the full range of sensitivity settings from ISO 80 to ISO 1600 and some truly advanced features such as centre-weighted and spot metering modes, AE Lock � activated and deactivated by pushing the ISO button while holding the shutter release depressed halfway � Flash Exposure Lock � activated the same way when the flash is set to Forced On � plus a feature called My Colours, which lets you choose from Vivid, Neutral, Sepia and B/W or set the contrast, sharpness and saturation separately. Finally, this is the only mode where you can enable the camera to use shutter speeds slower than one second for long exposures. There is a rather counter-intuitive way to do this: retrieve the control panel by hitting FUNC/SET, and while Exposure Compensation is highlighted, press the DISP button once to choose from a range of shutter speeds between 1 and 15 seconds using the navigation pad.
On the other side of the mode dial is the motion picture icon. There are two main movie modes, �Compact' and �Standard', both accessible via the control panel. �Compact' is optimised to be small enough for e-mailing: it is a mere 160x120 pixels at 15fps, clip length is limited to 3 minutes and even digital zoom is disabled. �Standard' can be set to one of three settings: 320x240 pixels at 30fps, 640x480 pixels at 20fps and a �Long-Play� version of the latter, which allows double recording time per unit of memory used. These figures may not sound exciting these days, but I have found 20fps to be fairly smooth. Clip length in this mode is limited to one hour �� a pretty long take if you ask me � but a more practical limitation may be card capacity or write speed. The optical zoom cannot be used while filming, but the lens can be preset to any available zoom setting beforehand, and digital zoom may be used if enabled. By default, exposure changes automatically during recording as seen fit by the camera, but it can be locked by pushing the ISO button � a surprisingly advanced feature. Exposure compensation is also enabled this way, which is another non-standard function in movie mode on most digital still cameras.
The PowerShot A580's menus are accessed by pressing � yes, you have guessed it � the MENU button. Two tabs are available in Record mode, and three in Playback. The Record menu tab has 11 options. AF Frame (AF Mode would probably be a better name) lets you choose from Centre Point AF, AiAF and Face Detect AF. The first one of these is self-explanatory, and will be the preferred mode for advanced users. AiAF utilises nine AF points, but it is the camera � not the photographer � that chooses which one(s) to use, so I have found it pretty pointless. Face Detect AF, while not entirely new, is still bound to be something of a novelty for many. It works very well and is actually a lot more fun to use than I thought it would be. When Face Detect AF is chosen, exposure and white balance are also optimised for the face(s) detected. If no face is found in the frame, the camera defaults to AiAF. Accuracy in all AF modes will depend heavily on light levels and whether the AF Assist Beam (see below) is enabled. AF Point Zoom is available in Centre Point and Face Detect AF and helps you check focus accuracy by magnifying the area under the AF frame when the shutter release button is pressed halfway. Digital Zoom should be turned off when shooting stills and only activated for capturing [standard] movie clips. The AF Assist Beam helps with AF accuracy in low light.
 |
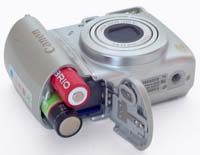 |
| Top of the Camera | Battery Compartment |
The flash options are Slow Sychro, Red-Eye Correction and Red-Eye Lamp. If Red-Eye Lamp is set to On, the camera emits an orange light before the flash fires, causing the subject's pupils to contract, thereby reducing the chance of redeye, whilst Red-Eye Correction attempts to remove it before the image is written to the card. If neither is successful, you may try to remove redeye yourself in Playback. Using the Display Overlay option, you can select to have Rule of Thirds gridlines and/or a 3:2 aspect ratio mask to be displayed on the LCD while framing your shots. The first one is a compositional guide as well as a tool to help you get the horizon to be horizontal and any verticals to be actually vertical in your images. The second one shows you where your photo will be trimmed if printing directly on photographic papers of a 3:2 aspect ratio, such as 10x15cm or 20x30cm. (Note that the image will still be saved on the card uncropped.)
You can map one of eight commonly used functions to the Print/Share button, which is otherwise idle in Record mode. My recommendation would be either Exposure Compensation or Custom White Balance or Face Select & Track. The last one of these is new to the PowerShot A580 and allows the camera's Face Detect AF to track a face which it has previously locked on to so that you can capture precious expressions at exactly the right time, without having to wait too long for the AF system to catch up. The setup menu tab, accessible at any time during playback or recording (except when in Easy mode), lets you customise basic camera functions to suit your preferences. Your settings will be remembered no matter which shooting mode you are in, and even after you switch the camera off and on again. Probably the most important of these is the ability to turn off all the annoying beeps and other sounds the camera makes during its operation. Formatting the memory card can also be performed from this menu.
The documentation that comes with the Canon PowerShot A580 may differ from market to market. My review unit had a Getting Started guide printed in several languages plus a nearly 200-page Camera User Guide on disk. In some markets, the latter also comes in print form. Also included is the newest version of the Canon Digital Camera Solution software pack. The Powershot A580 boasts a fairly big but low-resolution LCD. It may be shipped with a transparent screen protector, as seen in some of the product shots in the Design section, but it is not meant to be left on for shooting, as it makes the screen extremely hard to see outdoors. Even with this screen protector removed, daylight visibility remains a challenge, which is why having an optical viewfinder sitting above the LCD is most welcome. While not comparable to the TTL finders of SLR cameras � being small, tunnel-like and suffering from a parallax error � this OVF not only lets you frame shots when the LCD is hard to see, but it also allows you to save power and capture more photos per charge.
The PowerShot A580 is fairly snappy for a compact digicam. It turns on in less than two seconds, which should be fast enough in most situations. Auto-focus lag will depend on subject, zoom setting and light levels, but it does not normally exceed one second and is often less than that. It's still no action shooter but the speed is nothing to be ashamed of in the entry-level category. Once prefocused, shutter lag is almost unnoticeable. One area where the A580 disappoints is Continuous Shooting, with the burst rate specified at approximately 1.4fps � I've found it to be even less, around 1fps � while another one is the recycle time of its onboard flash, which is nearly 10 seconds after a full discharge.
Upon entering Playback, the last image taken fills the screen completely with no information overlay by default. The left and right navigation buttons are used to move from one frame to the previous or next one, while the zoom lever controls the magnification. An index view, with nine images displayed at a time, is also available.
Furthermore, the DISP button lets you cycle through the following screens:
- full-screen image with no information overlay,
- full-screen image with basic shooting data,
- thumbnail image with luminance histogram, blinking blown highlights and full information set, and finally
- a so-called Focus Check Display featuring a thumbnail in the upper left corner and a detail crop in the lower right, which can be magnified further to check for critical focus. If Face Detect AF was used when taking the shot, this screen can also be used to quickly judge if someone blinked.
Other playback options include image rotation, slide show, manual redeye correction � useful if Record mode redeye correction was not enabled when taking a shot or if it didn't prove 100% effective �, protecting and erasing images as well as attaching voice memos to any photo. Note that voice memos and movie sounds are not replayed if you have chosen to mute all camera sounds in the setup menu.
|
![]() PhotographyBLOG
is a member of the DIWA
organisation. Our test results for the Canon Powershot A580 have been submitted to DIWA
for comparison with test results for different samples of
the same camera model supplied by other DIWA
member sites.
PhotographyBLOG
is a member of the DIWA
organisation. Our test results for the Canon Powershot A580 have been submitted to DIWA
for comparison with test results for different samples of
the same camera model supplied by other DIWA
member sites.