Lightroom 2 Review
Review Date: August 18th 2008
Author: Jon Canfield
Leave a comment about this Review
Introduction
Now that Lightroom 2 has shipped, should you be considering a switch to Lightroom, or an upgrade from version 1.0? While the first release was a great start, as with any version 1.0 release, there's always room for improvement. Adobe clearly listened to photographers when compiling the new feature list for Lightroom 2. Not all the features people asked for made it in, but what did get added is well done and goes a long way towards making Lightroom a one-stop solution for digital photography. I'll take a brief look at the major new features in Lightroom 2 on a module-by-module basis.
Ease of Use
Library Module
The Library module has received the most visible changes to the user interface of all the modules. Some of this is a re-arranging of panels to make working with features easier, while others are major enhancements to existing tools.
On the left side, the Folders panel has been updated to show a true hierarchy of your drives. You'll notice that each drive is listed � even off-line drives if they've been used previously � along with how much space is used and the total space available.
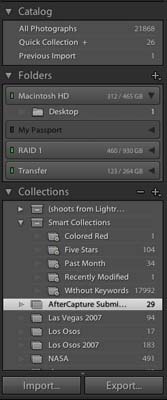
Figure 1
Collections have added Smart Collections. These special collections are automatically filled with images based on criteria you select. There are several included, and you can add your own.
The Library Filter Bar is a new addition that replaces the old Find section that was below the preview area. Now you can select Text, Attribute, or Metadata to filter on, each with its own options. To turn the filter off, just select None. You can also create custom filters from the pop-up menu, and save them as presets.
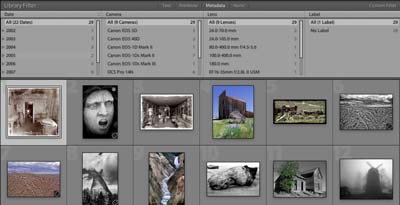
Figure 2
The Keywording panel now lives on the right side of the Lightroom 2 window, just below the Quick Develop panel. Along with the Keyword Tags and Keywords List, there is a new Keywords Suggestions that will make intelligent suggestions for you based on the image capture date and time, using keywords you've already applied to other similar images.

Figure 3
Develop Module
The big news here is the addition of localized correction tools. It's now less likely that you'll need to make a trip to Photoshop for many of your edits, and you have the advantage of doing all of these adjustments non-destructively, just like the other tools in Lightroom 2.
Just below the histogram, you'll see the new Edit toolbar. Crop, Spot Removal,� and Red-eye Correction have moved from below the main Preview panel to this new toolbar.
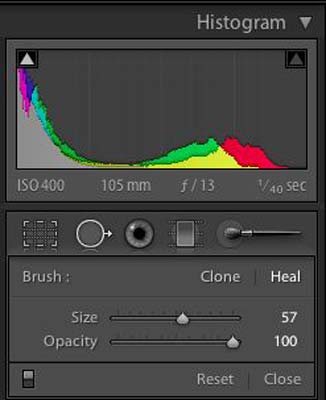
Figure 4
The Spot Removal (Clone)/Healing tool now has an Opacity adjustment to make blending more natural. The major change though is the addition of a Graduated Filter and Adjustment Brush.
Graduated Filter creates a gradient mask to adjust Exposure, Brightness, Contrast, Saturation, Clarity, or Sharpness. The Amount control adjusts how strong the effect is.
The Adjustment Brush has all of the same controls but adds Size, Feather, and Flow control. The Auto Mask option is a very useful tool to control where your adjustments are applied, and the Density control changes how strong the mask is.
Finally, you can set multiple brushes as well as an Erase brush. With both Graduated Filter and Adjustment Brush you can create as many adjustments as you like, each with different settings. As an added bonus, if you have a set of adjustments you like, you can save them as a preset for future use.
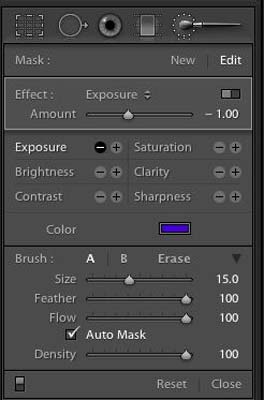
Figure 5

Figure 6
Another new addition to Lightroom 2 is the enhanced Vignettes control. As before, you can lighten or darken edges of your image, but now you have the option to adjust the roundness and feather. You can also choose to apply the vignette to the post-cropped image unlike Lightroom 1.x where the vignette was applied to the full image regardless of your crop, making it less than useful in many cases.
In the Details panel there is a new Loupe view that allows you to see the effect of sharpening and noise reduction without zooming in to 100% in the preview area. You can also lock the loupe to a specific location to keep an eye on a critical area while still seeing the overall effect.

Figure 7
To round out the Develop module, there are new camera profiles available as well as a profile editor. These are optional downloads from the Adobe Labs site (http://labs.adobe.com/wiki/index.php/DNG_Profiles).
Slideshow Module
The Slideshow module has received modest changes. The Titles panel has options to add Intro Screen and Ending Screen slides with a checkbox to include an Identity Plate. In the Playback panel, you can now select which screen to use for playback and whether to blank the other screens, as well as add a Soundtrack to the show (on the Mac, this automatically pulls your music from iTunes).
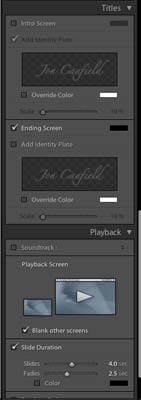
Figure 8
Print Module
There are some very useful additions to the Print module. First is the addition of Picture Packages. Like you'd expect, a Picture Package gives you multiple copies of the same image on a page. You can print different sizes on the same page, and because it uses templates like the standard print options, you can save your layouts for future use.
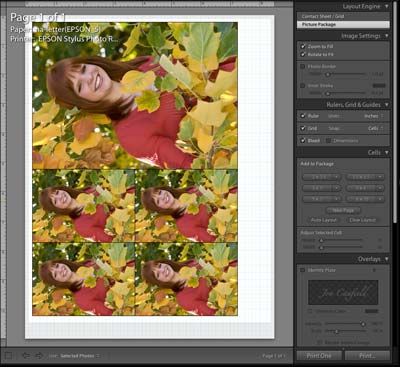
Figure 9
You can now choose to print to a printer or to a JPEG file. The later is useful if you send your work out for printing as it will generate a JPG with the embedded profile of your choice and at the final output size and resolution, giving you more predictable results.
The other major change to the Print module is in output sharpening options. You now have three choices, Low, Standard, and High, as well as Media Types � Matte and Glossy. These sharpening options are based on Bruce Frasier's Photokit Sharpener package for Photoshop. Lightroom 2 will apply the sharpening based on your selections and the output size you've selected.
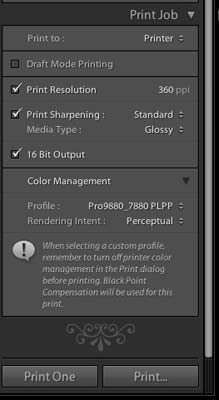
Figure 10
If you're a Mac OS X 10.5 user, you'll also have a 16-bit output option for printing.
Web Module
The Web module gains the output sharpening options seen in the Print module and adds a new Preview in place rather than having to build a temporary version of the website and launching a browser to preview.
Other New Items
Lightroom 2 now supports dual monitors and images can be sent to Photoshop CS2 or later as Smart Objects and Layers, as well as much larger images making panoramas a real option now.
If you're on a Mac with OS X 10.5, you can run Lightroom 2 in 64 bit mode, giving you access to all the memory in your system for better performance. Lightroom also performs better with very large catalogs now.
In addition to the features built into Lightroom 2, you can also download Export Plug-ins for a number of different sites such as Flickr, Zenfolio, iStockPhoto, and others.
The new SDK being released by Adobe will allow developers to create image processing plug-ins similar to the Merge to Panorama and Merge to HDR options included with Lightroom.
Conclusion
| |
|
|
Ratings (out of 5) |
|
| Features | 4.5 |
| Ease-of-Use | 4 |
| Value for Money | 4.5 |
Lightroom 2 is a solid upgrade to this popular workflow program. The addition of localized adjustments in particular will keep many people from needing to make a trip to Photoshop. Other enhancements are more subtle, but the all combine to make Lightroom 2 worth the upgrade. There are still some things missing, like soft proofing, but the new version is a clear statement by Adobe that they intend to make Lightroom into a complete tool for digital photographers.